
Palm Partnership Training™
Building a Partnership with Your Horse
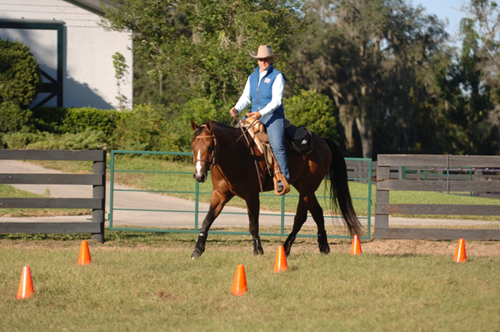
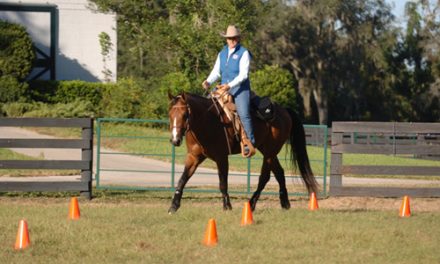
 I’m going to give you an exercise to practice that uses both the turning and bending aids. The pattern for this exercise is what I call a “training figure 8.” It is important to understand the difference between this training pattern, as opposed to what could be called a “show ring” or “competition figure 8” pattern.
The best way I can describe the training figure 8 pattern we will use is that it simulates the form of how the number “8” is written. Doing this pattern, the rider tracks across the diagonal to a half circle. After completing the half circle, she tracks across the opposite diagonal to complete the second half circle, which brings her back to the point where she started. This exercise requires the rider to use her aids from a bending turn to a straight line and a straight line to a bending turn in the opposite direction.
Contrast this to a true show ring or competition figure 8 pattern. When doing a show ring figure 8 pattern, the rider follows a vertical line to a half circle, completes the half circle coming back and returns to the vertical line. She follows the vertical line to the second half circle and completes that in the opposite direction. This pattern is a turn to a straight line, to a turn, back to a straight line. We will not use this pattern.
Let’s get back to our training figure 8 pattern. The horse must be in proper body position on both the straight lines and turns of the pattern. This puts the horse on his best balance. The key is keeping the horse straight between the rider’s leg and hand aids. The rapport between these aids is critical!
The rider should start the pattern at the walk to get the coordination of aids, and give herself more time to do the figure and feel the horse’s reactions in response to the aids. Once perfected at the walk, the exercise should be practiced at the trot. This figure is also great to advance to canter using a simple change of lead in the middle of the straight line.
In this example, the rider will start by bringing her horse on the pattern’s first half circle to the right. For the horse to bend properly to the right, the rider uses her inside or right leg. She brings her horse to the outside or left rein to keep his shoulder from moving out. Her left leg is slightly behind the girth to keep his hips inward. All her right rein does is to keep the horse’s nose and neck bent slightly in the direct they are moving. Her outside aids, the left leg and left rein, are used as her turning aids. She does not turn using the inside rein!
As he turns, if horse goes too far to the right (falling in), she uses her right leg and open light left rein to bring him to bring him back to the left. Completing the right half circle and coming on to the diagonal straight line, she uses her right leg and light left rein to bring her horse off the bending turn on to the straight line. Once on the diagonal, her aids are only used if the horse starts to lose straightness. For example, if he fades to the left, she uses her left leg and right rein to straighten him.
Before she turns on to the next half-circle to the left, she applies the bending aids of left leg to the right rein. She keeps the right rein against the horse’s neck so his shoulder does go out. Her right leg is slightly further back to keep her horse’s hips inward. Her left rein lightly positions the horse’s head and neck in the direction in which they are traveling. If the horse falls in too far to the left, she’ll use her left leg and right rein to correct him. Then she’ll maintain the straightness with her right leg and left rein. If he goes too far to the right, she’ll use her right leg and left rein to correct him.
As she leaves the left half-circle, she straightens her horse using her left leg and right rein. She maintains this straightness by evenly applying her left and right leg and hand aids.
Your Next Step…
Over the past several articles, we have discussed in detail the role of the bending and turning aids. Here is a thumbnail review of the aids sequence used when going from a straight line to a turn and returning to the straight line, as is practiced in the training figure 8 pattern:
1. Start the figure on one of the pattern’s straight lines using even leg aids and rein aids to keep the horse straight.
2. BEFORE the turn, use the bending aids (the inside leg, and open inside rein) supporting the bend with the outside leg and outside indirect rein against the neck.
3. As you get to the turn, use the turning aids (the outside leg and outside indirect rein) to direct the horse through the turn.
4. BEFORE going straight again, use the straightening aids (the inside leg to stop the bending and bring the horse to your outside open rein).
5. As you get back to the point of going on a straight line again, evenly apply both leg aids and rein aids as to keep the horse forward and straight.
The process starts over again before the next turn.