

Palm Partnership Training™
Building a Partnership with Your Horse
 We’ve reviewed what the term “aids communication” means and why it is so important to success in communicating with our horses. In the next few articles I am going to share training techniques built on the use of the rider’s natural aids, meaning her seat, legs, and hands—not artificial training aids or gimmicks! You will learn how to teach your horse to respond more willingly, without using force. This is the path to building a long lasting, true partnership with your horse.
Our goal is to have a horse respond to the lightest of aids effortlessly, softly, willingly, and immediately. When we reach this step, riding and training become rewarding and so much fun!
Let’s set a foundation for riding success by incorporating two important steps into each riding session. This article contains tips to improve the first step…mounting properly.
The First Step: Mounting
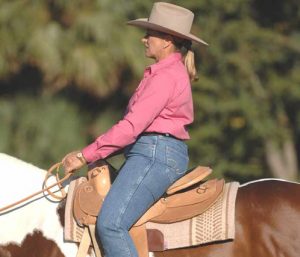
For me the most important thing with any horse is that he stands still for mounting. This shows me that he is obedient, mannerly, and thinking slow.
The rider has a responsibility in the mounting process, too. She must learn to mount properly, in a balanced manner, without pulling the saddle towards her across the horse’s back. Whether using an English or Western saddle, here are some tips to help improve your mounting.
Mounting is typically done on the horse’s left side. The horse should be standing relatively square. As you address the horse to mount, hold the reins evenly. You must be flexible enough to pick your left foot up and put it in the stirrup without pulling the saddle towards you.
When you are ready to mount, look ahead and push off with the right foot. As you rise up in the stirrup, bring right hand up so it gently grasps the cantle. Swing your right leg over the saddle while moving the right hand from the cantle to the pommel. Sit down easily on the horse’s back. Put your right foot in the stirrup.
What should you do if your horse does not stand still while mounting? Use a fence! Position the horse so that a fence is on his right side and he is facing a fence corner or a wall. The fence and corner/wall will keep him from moving sideways or forward while you mount.
Mounting properly requires good timing and practice. Because it is one of the first things we do with our horses before starting a schooling session, any issues we have with mounting can set the tone for the rest of our ride. If you are having difficulties with mounting, read the “Your Next Step” section of this article for some special tips.
Next time I will cover one of the most important, but often overlooked preparations a rider should include in her daily riding routines. It is key to preparing herself and her horse to communicate together. Do you know what it is?
Your Next Step…
A horse that does not stand still for mounting is not just difficult to get on, he can be safety problem! Is he jigging around when you want to mount? He may be thinking too fast and walking away in anticipation that you will ask him to go forward immediately after mounting up. More likely, he is trying to catch his balance because you are not mounting him properly. Here are some specific steps you can do at home to improve this situation.
I suggest that you start working with a mounting block. These are inexpensive, plastic step-like platforms made to give a rider an elevated surface to mount from. Because the mounting block will put you higher off the ground, it will be easier for to mount and swing your leg over the horse. Mounting blocks also decrease the stress on the horse’s back from riders who pull themselves up into the saddle. They are also very helpful for smaller riders mounting a large horse.
As you build up your strength using the mounting block, teach your horse to stand to allow you to mount properly. To reinforce this lesson, mount your horse in the same location every time you ride. Choose a spot where you can position the horse between a fence and the mounting block. The fence will help him stay straight and focused. Ask him to stand “square”. This means positioning him so that his hooves are positioned like the 4-corners of a rectangle and his weight is equally distributed on all four legs.
Ask him to “whoa” and step up on the mounting block as if you were going to get on him, but do not mount. Because you will be standing above his topline, he may need some time to accept you in this new “elevated” position. He may also move, anticipating that you will be mounting and he will need to balance himself. If he moves, calmly reposition him and repeat this step. Take time for this step and do not proceed until he is relaxed.
Practice this mounting procedure using the block while teaching the horse that mounting does not mean move forward. Position him in the mounting spot and ask him to “whoa” by putting slight tension on the reins. Place the reins over his neck being careful to maintain the same amount of tension in each rein. Riders have the tendency to pull on the left rein while mounting, causing their horse to circle toward them. This makes getting on even more difficult.
To prevent pulling on the reins, keep your hands in front of the saddle. If the horse wants to move as you attempt to mount, avoid walking him in a circle to get back into position. This will only reinforce that mounting means it is okay to move forward. Instead, stop him and back him up the to block or reposition the block next to him.
Once your horse in is position, step up on the block and gather up the reins by sliding your left hand on the horse, starting at the buckle and moving up on the horse’s neck. Still holding the reins, move your left hand so it is grasping the front of the saddle as you place your right hand on the saddle’s cantle. Put your left foot in the stirrup and start to mount, but just swing your leg only halfway over his back, then dismount. Praise your horse when he stands still. Do this several times. You may need to repeat this lesson over several days or weeks until he understands that mounting does not mean moving forward.
When he shows he is willing to stand perfectly still for the “half” mount, swing your leg over his back. As you do, transfer your right hand from the cantle to the saddle’s pommel to help you balance. Then sit down on his back, but do it as softly as possible. Mounting this way, without pulling the saddle across his back, will encourage him to stand still.
After you and your horse have mastered mounting with the block, you still have some homework to do. Use the mounting block to help you build up strength in your arms and legs to allow you to mount from the ground. Most mounting blocks have two steps. Practice mounting from the highest step, graduate to the lowest step as your strength improves, until you can mount from the ground. Continue using the same mounting spot to reinforce your horse’s understanding to stand once you graduate to getting on from the ground.
Until then, follow your dreams…


