
Palm Partnership Training™
Building a Partnership with Your Horse
In this article we are continuing our discussion of how to “pony” your horse. “Ponying” means leading one horse from another horse that you are mounted on. In the last issue I shared the benefits of ponying, equipment needed, and how to start at the walk. If your pony horse shows he understands what you are asking him to do at the walk, we can move on in this newsletter to teaching him to pony at the trot. The pony horse must be able to do the basics I’ve described in these newsletters at the walk and trot, in both directions, and be able to back before we can graduate to ponying him outside a confined/enclosed area.
Let’s review a few important basics. I’ll refer to the horse being lead or “ponyed” as the “pony horse”. The horse that you will be mounted to lead the pony horse is the “lead” horse. Always begin ponying in an enclosed fenced area, such as a paddock, in case the pony horse would get away from you.
Equip the pony horse with a properly fitting halter and thread the longe line with a short chain end through the halter’s side ring, over the nose, and snap it to the side ring on the opposite side of the halter. Put leg protection on him such as polo wraps.
Be sure to hold the longe line a neatly stacked coil in your right hand. The longe line loops should be roughly the same length. I like to keep my index finger and my thumb between the last loop leading out to the pony horse. This lets me use my fingers to take up a little on the longe line if needed, or give out more line.
We will pick up this lesson as if you have already warmed up by ponying the horse at the walk and are ready to trot. I will describe this exercise as if leading the pony horse from the off (right) side of my lead horse.
Start by going to the left, the easier side to keep the pony horse turning. If possible, follow a fence line because it will help keep the pony horse in alignment. This lesson becomes more challenging whenever you move off the rail because the pony horse no longer has a barrier (the fence) to keep him straight.
Remember… everything will be happening faster at the trot. Really use your peripheral vision to keep track of where you are going while keeping a close eye on the pony horse’s position so you can correct any speed or body alignment issues.
Use a voice command TROT as you apply seat and leg aids to ask the lead horse for the transition. Move your right hand forward to signal the pony horse to do the same. Keep your arm and elbow flexible so you can react quickly and smoothly if the pony horse lags behind or speeds up. This will also keep you from being pulled out of position in the saddle or jerking on the longe line.
Watch the pony horse carefully. Our goal as we move from the walk to the trot is to keep the pony horse in position between the lead horse’s neck and the rider’s leg. If he gets behind your leg, he is too far back. If he gets far in front of the lead horse’s neck, he is too far forward. Keep the lead horse moving at the speed of the pony horse—and not the other way around. You may need to use a “cluck” to encourage the pony horse to move forward. Or if he surges ahead use your voice to say “EASY” and reinforce it with a slight check on the longe if he pulls ahead of the lead horse.
The pony horse must stay straight during the transition as you trot forward. If the pony horse “falls in” toward the lead horse, “remind” him to keep the proper distance from the lead horse, by swinging the longe line between them. If this does not get a response from the pony horse, shake or “toss” the looped longe line towards him. The degree to which you will use the longe line will regulate how much the pony horse will move away from you. If the pony horse “falls out” (away from the lead horse) especially when you start making a circle to the left, use a slight tug on the longe to bring his head back into alignment.
Trot for several strides alongside the fence. If he responds well, turn away from the fence to do a circle to the left. Evaluate how well he stays straight without the security of the fence to guide him. If you need to, go back to working alongside the fence until he understands to stay straight.
Trot a short distance then verbally give the command WALK as you use your aids to slow the lead horse. Watch to maintain the space between the horses. Praise the pony horse as he makes the downward transition to the walk. Ask for a WHOA alongside the fence to help keep the pony horse straight.
The rider needs to be able to walk and trot the pony horse in both directions before she ponies him outside of the confined area. So let’s change directions and practice ponying at the trot to the right.
As I mentioned last week, ponying to the right offers different challenges. You will need to increase the speed with the lead horse since he will be on the outside of the turns and decrease the speed of the pony horse. If you do not keep your lead horse forward enough and up with the pony horse, the pony horse will be turning his head into the lead horse all the time.
Use the verbal command TROT and apply your aids to ask the lead horse for the transition. The pony horse may have a tendency, especially going to the right, to move outward and too close to the lead horse. Be ready to use the longe line to keep him away. Keep your right arm flexible and be ready to react to keep the pony horse in position if he lags behind or speed up in front of the lead horse.
Practice backing as part of the ponying lesson. It’s easier to teach this alongside the fence to help keep the pony horse straight. With the pony horse between the lead horse and the fence, give the verbal command to BACK as you ask the lead horse to back. You may need to give a gentle tug on the longe line to reinforce the command. If the pony horse learned basic ground training maneuvers, he should understand what this command means and respond correctly. If not, you may need to re-teach him backing from the ground before repeating it as part of a ponying lesson.
Once the pony horse trots well in both directions, you should be able to move away from the fence, ask him to whoa, and expect him to stay straight. When he stops, ask him to back a few steps without the aid of the fence. Watch so that he stays straight and does not move sideways. If he does bring him forward, reposition him, and ask again. Praise him with a pat or stroke on his neck or forehead when he responds correctly.
Your Next Step…
If your horse is sluggish or lazy, make sure to work short sequences during ponying. Vary the gait, speed within each gait, and direction to keep him more attentive.
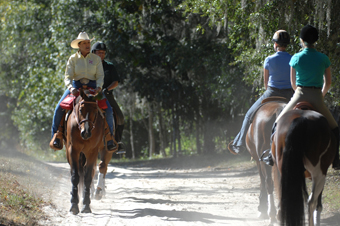
Ponying is a great exercise that teaches the pony horse to accept being next to another horse. As soon as the horse is responding well to ponying in both directions as the walk and trot, it is time to get him out of the confined area. This helps keep his interest. You can pony him along trails, in big areas like fields, and around the farm. This helps reduce the pony horse’s tendency to become annoyed with the lead horse alongside him and allows you to spend more time ponying him.
Until then, follow your dreams…
Lynn
For more information about Lynn Palm, her clinics in Florida and other parts of the U.S., DVDs and more, visit www.lynnpalm.com or call 800.503.2824.