
BUILDING A PARTNERSHIP WITH YOUR HORSE

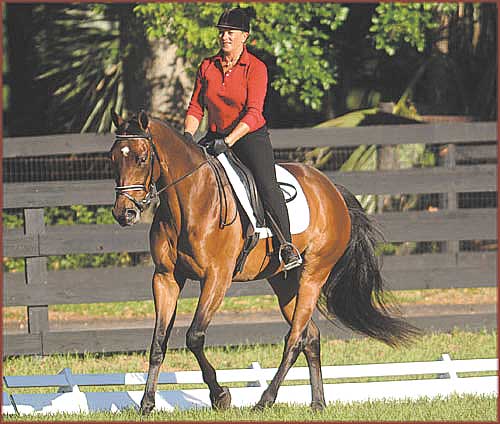
Lynn Palm. Photo by Cappy Jackson.
This month’s article is the beginning of a series based on the second part of my visual series, “Dressage Principles for the Western and English Horse and Rider.” This part is titled “Communicating with Your Aids—Keys to Success” because I believe that it contains the lessons every rider needs to learn in order to create a responsive and willing horse.
Throughout this series, I am going to share training techniques built upon the use of the rider’s natural aids—the seat, the legs, and the hands—rather than artificial training aids or gimmicks. By learning how to use the natural aids, the rider learns how to control the horse’s entire body. The rider’s aids are the keys to success because they are the keys to communication with the horse.
The aids used to communicate with the horse are not complicated for us, or for our horse, to understand. The challenge comes in learning how to coordinate the use of these aids with the horse’s actions or movements to get the response we want. In this series of articles, I will explain how to use each of the rider’s aids correctly and according to the horse’s knowledge. You will learn how to teach your horse to respond more willingly without using force. This is the path to building a long-lasting and true partnership with your horse.
Here is how I will proceed with the important lessons in this series. I will cover simple basics to teach the horse to respond to the rider’s aids. The foundation in building an understanding between the horse and rider comes through learning how to correctly use seat, leg, and hand aids. I will teach you how to introduce these basic aids to your horse through using different patterns. I use patterns because, when a rider changes direction, gaits, or speed within any gait, the horse learns more easily. As a rider, you will learn how to more effectively use your aids to communicate with the horse. This work will help you learn more about your horse’s personality, sensitivity, and level of knowledge. By continuously and consistently analyzing his reactions, you will build a willing rapport with your horse. Our goal is to have a horse respond to the lightest of aids effortlessly, softly, willingly, and immediately. When we reach this point, riding and training become rewarding and fun.
I always start with the basics to build a strong foundation for future advanced lessons. In this series of articles, I will start with the very basics of riding. This will be helpful for beginning riders. Those of you who are more experienced riders also will benefit from these lessons if you use them to help you correct any problems you may be having with your horse. So many of the problems that experienced riders encounter may be traced back to a problem in a basic element of their riding–a flaw in their foundation. By going back to these basics, you may discover the missing element to help you correct that problem.
Equipment
I like to use a bit-less bridle, called a sidepull, for either beginner riders who are learning to use their aids, or with young horses. It is a great tool for building confidence and relaxation in both the horse and the rider. For horses that display signs of not accepting the bit, such as opening the mouth or having a busy mouth, a sidepull is a good bridle to use.
A sidepull resembles a regular bridle; but, instead of the reins being attached to a bit, each rein is attached to a ring on the side of the bridle’s noseband.
The sidepull works off the bridge of the horse’s nose. Properly fitted, the noseband of the sidepull should lay down on the bridge of the horse’s nose, but not so low that it is down on the nostrils. To find the correct spot where the sidepull noseband should rest, run your hand down the horse’s face towards his nose. You will feel the bone change to softer cartilage as you get near the nose. The sidepull should lie over this cartilage above the nostrils. The noseband should fit just snug enough to get two fingers underneath it. If you were to use the reins to move the horse’s head from side to side, the noseband should be secure enough so that it does not twist or turn on the horse’s nose.
If you do not have a sidepull and do not wish to obtain one, a simple Western or English snaffle bit will work with the training exercises in these articles.
Mounting
For me, the most important display of good manners that any horse must have is to stand still during the mounting process. If he does so, it shows me that he is obedient, mannerly, and thinking slowly.
The rider also has a responsibility in the mounting process. The rider must learn to mount properly, in a balanced manner, without pulling the saddle towards her across the horse’s back. Whether you are using an English or Western saddle, following are some tips to help improve your mounting technique.
Mounting is typically done on the horse’s left side. The horse should be standing relatively square. As you prepare to mount, hold the reins evenly. You must be flexible enough to pick your left foot up and put it in the stirrup without pulling the saddle towards you. When you are ready to mount, look ahead and push off with the right foot. As you rise up in the stirrup, bring your right hand up so it gently grasps the cantle (back of saddle’s seat). Swing your right leg over the saddle while moving the right hand from the cantle to the pommel. Sit down easily on the horse’s back. Put your right foot in the stirrup.
If your horse does not stand still when you’re mounting, use a fence. Position the horse so that a fence is on his right side and he is facing a fence corner or a wall. The fence and corner/wall will keep him from moving sideways or forward while you mount.
Mounting properly requires good timing and practice. Because it is one of the first things we do with our horses before starting a schooling session, any issues we have with mounting can set the tone for the rest of our ride.
In the next article, I will cover in more detail how to deal with problems in mounting.
Lynn Palm teaches and coaches riders and horses. She also develops training and educational products. Learn more on Lynn’s Web site at www.lynnpalm.com.
